Tuesday, September 10, 2013

Getting Started: Learning The Night Sky


Astronomy is a fascinating hobby for the beginner and doesn't necessarily require complicated or expensive equipment to get started. Equipped with nothing more than the naked eye, a map of the stars and an inquisitive mind it is possible to observe many fascinating features of the night sky. Once you are ready to take the next step, a good pair of binoculars is often a much better investment than a similarly priced telescope. Binoculars are simple to use and readily available and will provide you with an excellent view of the moon and planets; constellations; meteor showers and even the odd deep space object. In fact, this is probably the best way to start - it allows you to learn the night sky and navigate easily to points of interest.
A view of Orion from my suburban, light-polluted, garden
There are plenty of books and magazines that you can use to help you find your way around; 'Philip's Stargazing 2013' or a 'Philip's Planisphere' are both popular choices, however, I would particularly recommend 'Turn Left At Orion' by Guy Consolmagno and Dan M. Davis. Written specifically for beginners, it is the perfect reference book for the amateur astronomer, providing easy to follow instructions on how to find the most common celestial objects as well as illustrating how they will appear through low and high powered scopes.

For the more technically minded, there are some excellent interactive planetarium applications available for the home computer, providing a 3D view of the night sky based on the date, time and location. Stellarium is a free application for Windows, Mac and Linux and is extremely popular due to its ease of use and the number of advanced features it boasts, including telescope control, large object databases and detailed information about the objects you may wish to view.

A screenshot from Stellarium
As most people probably don't want to be setting up their home computer out in the garden, there are a number of excellent mobile planetarium Apps available for smartphone and tablet devices, that provide a highly portable interactive sky map. The more advanced of these Apps provide a similar level of features to the free desktop applications, making them a useful tool when trying to find a particular object in the night sky.

Remember, learning your way around the constellations is a fascinating way to start observing the night sky and does not require anything more complicated than a map of the stars and a pair of binoculars. If you do decide to take things further, learning to navigate the stars from the beginning will help you out immensely when you eventually decide to take the plunge and buy your first scope.

Sunday, September 01, 2013

Capturing and Processing Andromeda


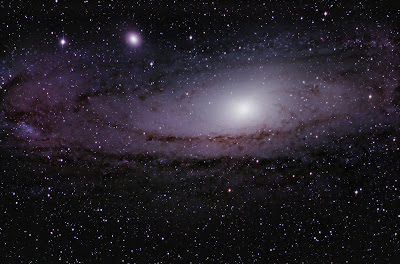
I think this has to be my favourite image so far - captured last night from my back garden using my astro-moddified Canon EOS 1000D, attached to my Sky-Watcher Explorer 190MN Pro. The image is of our close neighbour - the Andromeda Galaxy (M31) - and is the result of almost 90 minutes of exposures (5 x 5min + 30 x 2min), aligned and stacked using Nebulosity 3 and processed using Adobe Photoshop CS6.

The Andomeda Galaxy (M31)
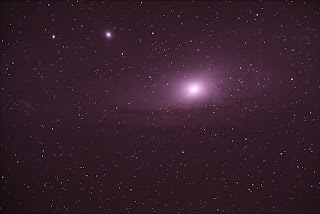
Having initially aligned and stacked the images in Nebulosity 3, I exported the stacked image as a 16 bit TIFF file so that I can process it in Adobe Photoshop CS6 - it is important to remember that at this stage the majority of the finer detail is obscured, so we need to do some tweaking in order to get a nice clean result.

Unprocessed image of M31 after initial alignment and stacking
Without going into too much detail, there are a several stages that we need to perform on this image in order to get it to look like the one at the top of this post. Many thanks to Neil Heacock for sharing his workflow online for others to use.

  1. Adjust levels and curves - effectively, we want to ensure the image is not clipped whilst enhancing the lighter areas of the image so they show up more in contrast to the darker background.
  2. Apply gradient filter - I use Russell Croman's Gradient XTerminator, which is a paid-for plug-in filter for Adobe Photoshop CS6. This basically reduces vignetting in the image that can result in significant colour gradient across the image - especially in the corners.
  3. Apply Local Contrast Enhancement action - this is the first of Noel Carboni's Astronomy Tools for Photoshop. Again, you'll need to purchase these tools, that are effectively a set of pre-programmed actions, but they are an invaluable tool and will deliver excellent results whilst saving you significant time and effort. The purpose of running the Local Contrast Enhancement action is to enhance the contrast between the cloudy elements of the galaxy and the darker dust lanes.
  4. Apply Enhance DSO Reduce Stars action - another of Noel Carboni's tools, this one increases the lighter areas of nebulosity without increasing the brighter portions of the image, increasing brightness without over exposing the stars.
  5. Increase Saturation - this enhances the colour of stars and dust lanes in the galaxy. be careful not to go overboard with this - you do not want the image looking over processed.
  6. Apply Noise Reduction. Another of Noel Carboni's tools - I told you they were invaluable. There are two versions available in his set of tools. Space Noise Reduction (SNR) and Deep Space Noise Reduction (DSNR). SNR will reduce the effect of noise across the entire image, whilst DSNR will leave the brighter areas alone and just reduce the effect of noise in the background. In the image above I used SNR initially, as I had a little noise in the nebulosity, then ran DSNR to further reduce the noise in the background.
  7. Apply the Smart Sharpen filter - if applied to the highlights, whilst filtering the shadow areas, this filter does a nice job of sharpening the detail in the nebulosity and dust lanes without re-adding noise to the overall image.
  8. Apply Less Crunchy More Fuzzy action - the last of Noel Carboni's tools that we need for this image, this adds a little blur to the nebulosity areas, adding the final layer of polish to your image.