Thursday, July 19, 2018

M13 - The Great Cluster


The unusual run of good weather this summer has resulted in plenty of clear nights recently, but the disadvantage of working away from home is that I have been unable to take advantage of this. However, I now have a couple of weeks off work, so wasted no time in getting the observatory up and running again. This image was captured using a QHY8L and Altair Wave 115ED with 0.79x reducer and field flattener. It is the result of 25 x 180s exposures, captured using Sequence Generator Pro 3, preprocessed using PixInsight and with final processing done in Photoshop CC.


The Great Cluster in the constellation Hercules – also known as Messier 13, or M13 – is considered to be the finest globular cluster in the northern hemesphere. It conatins more than 300,000 stars and is 25,100 light-years from Earth.

Friday, January 08, 2016

Comparing the Sky-Watcher 190MN Pro and Altair Wave 115ED with 0.79x Reducer/Flattener


A rare combination of clear skies, stable atmospherics and no moon last night finally provided me with an opportunity to fully test the potential of the Altair Wave 115 ED Triplet Refractor, combined with the Planostar 0.79x Reducer/Flattener - and boy was it worth the wait!

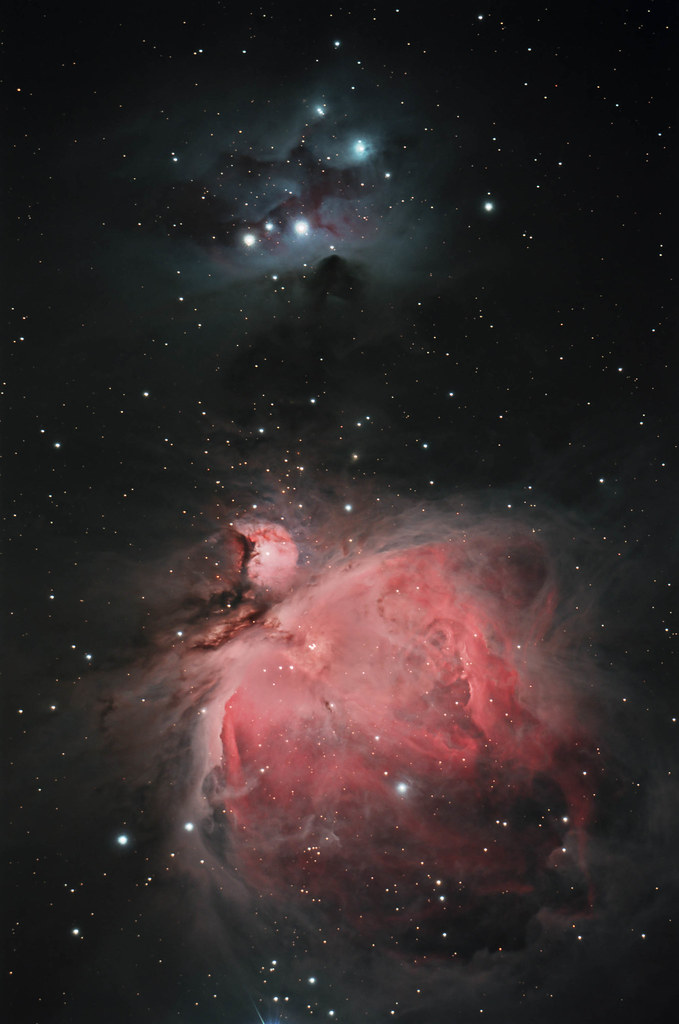
I wanted to compare the results to my previous scope - the extremely capable Sky-Watcher Explorer 190MN Pro Mak-Newtonian Astrograph.  So I chose one of my all-time favourite subjects - M42, the Great Orion Nebula and Running Man.  The image I captured using my 190MN was the first of my own astro-photos that made me go wow!  The image comprised of 10 x 300s, 10 x 200s and 25 x 45s exposures, captured and stacked using Nebulosity 3 and processed using Photoshop CS6.  The final result is now framed and has pride of place on the wall above my desk.  I was convinced it was going to be hard to beat.

My previous attempt, using the Sky-Watcher Explorer 190MN Pro
Now, before I compare the images I must point out that this is not going to be a direct, scientific comparison.  For a start, there are a couple of significant differences between the 2 scopes; FOV being the most obvious, with 1.35° x 0.9° for the 190MN Pro, vs 2.13° x 1.42° for the 115ED with the 0.79x Reducer/Flattener fitted.  The aperture being another significant difference, with the 190MN Pro being 65% larger than that of the 115ED.  The 190MN Pro is also marginally faster, with a Focal Ratio of 5.3, vs 5.53 for the 115ED.  However, I did use the same QHY8L CCD camera to capture the image and the NEQ6 mount and Lodestar XPress guide camera were also the same.

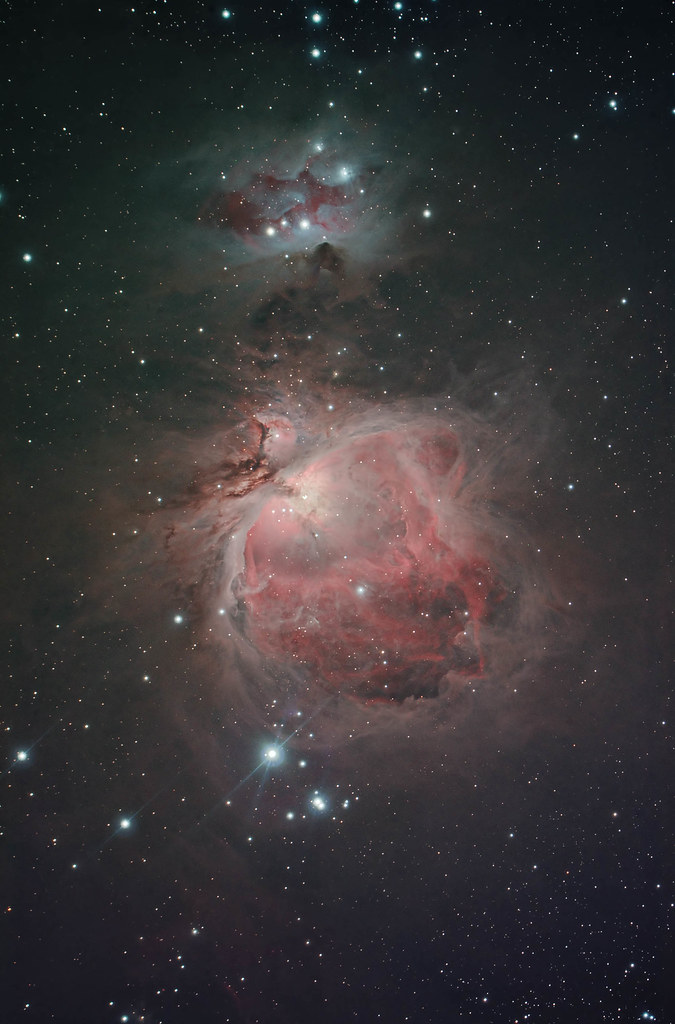
In an attempt to compensate for the smaller aperture and slightly slower Focal Ratio, I increased the length of the exposures to allow as much light to reach the camera's sensor as possible.  The final image, which you can see below, is the result of 14 x 600s and 15 x 30s exposures, captured and stacked using Nebulosity 4 and processed using Photoshop CS6.  Some may say this is an unfair comparison, but all I wanted to do was see if the Altair Wave 115ED was capable of achieving similar results to the Sky-Watcher Explorer 190MN Pro.  The answer is yes - definitely!  But that is my opinion - let me know what you think.

My latest version, using the Altair Wave 115ED and 0.79x Reducer/Flattener

Sunday, November 01, 2015

First Light With The Planostar 0.79x Reducer/Flattener


The weather wasn't brilliant on Halloween, but it was the clearest night for some time and so an ideal opportunity to test out my new Altair Planostar 3" 0.79x reducer/flattener - and what better target to choose on Halloween than the Wizard Nebula!

Once focussed, I was immediately impressed with the apparent flatness of the preview image. The stars were small bright pin pricks of light and those in the corners did not appear elongated. I chose an exposure length of 600s and set up the camera to capture a series of 15 images. When it came to processing, I had to discard 6 images due to worsening conditions as the night progressed, but in the earlier images it was evident that the faster focal length meant I was able to capture a reasonable amount of nebulosity.

NGC7380 - The Wizard Nebula
Overall I am quite pleased with the final image; especially considering the conditions. I'm sure that on another night, with better seeing, I could draw out a lot more of the fainter nebulosity, but the overall flatness of the image and nice crisp round stars proves the value of the reducer/flattener - I can't wait to try it out on a crisp and clear night.

Monday, April 06, 2015

The Leo Triplet


Work has been getting in the way recently so I haven't had much opportunity to get the telescope out, but the Easter holidays has meant I have been at home and the unusually good weather has given us astronomers a couple of relatively clear nights. Whilst the sky has not been completely clear, it was worth having a go at capturing some Deep Space Objects, although the near full moon rising just after 22:30 meant that I didn't have log before sky glow eliminated all but the brightest objects.

After a surprisingly quick setup, considering how many weeks it has been since I have had the scope out, I slewed to the M66 Group - otherwise known as The Leo Triplet. This group of three galaxies is about 35 million light-years away in the constellation Leo and consists of the spiral galaxies M65, M66, and NGC 3628.

The final image is the result of 8 x 300s exposures captured with a QHY8L camera attached to my Altair Wave 115 triplet refractor. The images were captured and stacked using Nebulosity 3 and processed using Photoshop CS6.

The Leo Triplet

Sunday, February 22, 2015

The Rosette Nebula


With a clear sky forecast all night last night, I decided to have a go at imaging something new last. A quick look at Stellarium showed that the beautiful NGC2237 - otherwise known as The Rosette Nebula - was perfectly positioned in the sky. So, with my son to assist, I set-up the scope and had the target centred in my field of view within 20 minutes. After ensuring the focussing was okay I initiated a series of 14 x 900s exposures, using Nebulosity 3 to control the QHY8L CCD attached to my Altair Astro Wave 115 triplet refractor. I initially tried a medium 'dither' between shots - this basically moves the scope a little between each shot to try and minimise any backlash in the mount, but it took ages to settle down for the next exposure so I cancelled that and re-started without the 'dither' option selected.

With over 3 hours of data to collect, we retired inside to keep warm and left it running. Once the imaging run was complete I decided to have a go at capturing some 'Flats'. I have not used them before, but I have a few dust spots on my optics somewhere and I was given some good advice on Stargazerslounge last week about using Flat frames to get rid of them, so I thought I'd give it a go. I don't have a light panel, but my iPad screen with a sheet of paper in-front of it to defuse the light, seemed to work well enough.

When it came to processing the image the Flats and Darks made a good job of getting rid of a lot of artifices, although there were still some that needed removing manually. It was also at this stage that I realised that having stopped the session to turn of the 'dither' option, my focussing wasn't as spot on after I restarted. As a result, the Stars were not as sharp as I would have liked. I also have doubts about the field flattener - it is probably something to do with the spacing between flattener and CCD, which needs to be accurate down to a very small tolerance - more work required there I think. However, after a little processing in Photoshop, the final result is actually fairly reasonable I think.

The Rosette Nebula (NGC2237)
The Rosette Nebula (NGC2237) - 14 x 900s, Altair Wave 115 Triplet and QHY8L


Tuesday, February 17, 2015

Feeling Crabby!


Despite not feeling particularly well yesterday, the forecast of no moon and a clear sky all night provided an opportunity to test out my new Altair Wave 115 refractor on a deep sky object that could not be missed. So, as the sun dropped below the horizon I started moving my gear outside and setting up for an imaging session.  Once everything was setup and balanced correctly, I selected the Crab Nebula (M1) in Stellarium and slewed the scope to roughly the right location. I then used AstroTortilla to do a quick plate solving routine that established the accurate position of my scope and automatically re-centred on the right point in the sky - I love this software - so much easier than messing about with alignment stars.

Once it was dark enough to start a proper imaging run, I used Nebulosity 3 to instruct my QHY8L CCD to take 15 x 300s exposures, relying on PHD2 to accurately guide my scope through my Starlight XPress Lodestar camera and TS off-axis guider.  I then retired indoors for a nice warm drink, where I was able to monitor the progress via screen sharing on my iMac. Once the session had finished I went back outside and packed everything away.  I then went to bed - I wasn't feeling well after all.

The following morning, I reviewed the images and was pleased that only 1 image needed to be discarded.  I then used Nebulosity 3 to apply the dark callibration frames to the 14 remaining images before stacking. The result was a relatively noise free, although faint, image of the nebula, but most surprisingly, was the flatness of the image compared to those I got from my previous scope - the Sky-Watcher Explorer 190MN Pro.  With the exception of 1 corner, the stars seemed perfectly round across the image and there was no vignetting or background gradient at all.  Application of Neil Heacock's processing workflow, using Photoshop CS6 and Noel Carboni's Astronomy Tools resulted in a very nice looking image, with a stunning array of stars and a lovely structure to the filaments of the nebula. Overall, a pleasing result from my new scope.

The Crab Nebula (M1)
M1 The Crab Nebula - 16 Feb 2015


The Crab Nebula (M1) - Cropped
Cropped version of the same image, showing a closer view of the nebula

Monday, May 26, 2014

M13 The Great Globular Cluster - Lacking Colour


Sometimes things don't quite work out as expected. My latest image - M13 The Great Cluster in the constellation Hercules - is the first image I have taken for a while and the first taken using an Off Axis Guider instead of a guide scope. This should have been enough to warn against making too many changes, but I also decided to try out the latest version of Nebulosity 3. I used to use Nebulosity 3 as my camera control software with my Canon EOS, but when I upgraded to the QHY8L CCD it wasn't compatible so I started using EZCap - the software that comes bundled with QHY CCD cameras. However, the newest version of Nebulosity now supports the QHY8L so I thought I'd give it a go and I actually got on really well with it - until it came to processing. I'm not sure what went wrong, but my images seem to lack colour. There is a hint of it in there, but not enough to show the amazing blue and red stars in this beautiful cluster.

M13 - The Great Cluster

The image was captured using my QHY8L camera attached to a Sky-Watcher Explorer 190MN Pro, guided using an Off Axis Guider and Starlight Xpress Lodestar guide camera. It is the result of 10 x 180s images, captured and stacked in Nebulosity 3 and processed in Photoshop CS6. I believe that Nebulosity may have automatically debayered the image prior to saving it to disk - obviously the settings must have been wrong. Whilst it is a lovely image, showing lots of detail in the cluster, I can't wait to try again. Next time I will do a sample run with Nebulosity to see if I can get it working, otherwise I will have to revert to EZCap.

Saturday, May 24, 2014

Tuesday, November 12, 2013

M42 Orion Nebula - First Light With The QHY8L


After what seemed like a long wait, I finally had a clear night this week and managed to get first light with the QHY8L that I purchased second hand on astrobuysell.com. The target was M42 (the Orion Nebula) and I have to say that I am quite pleased with the result. The image was captured using the QHY8L camera, cooled to -20 degrees, and attached to a Sky-Watcher Explorer 190MN Pro. The image consists of 10 x 200s and 10 x 45s exposures, captured using the QHY EZCAP software, with initial processing and stacking in Nebulosity 3 and final processing in Photoshop CS6. Equipment used is the Sky-Watcher Explorer 190MN Pro, mounted on a NEQ6 with a 2" Hutech IDAS LPS P2 filter to enhance contrast and reduce the effect of light pollution.

The Orion Nebula (M42)
M42 Orion Nebula

The shorter exposures were important so that the Trapezium (tight group of 4 bright stars in the core) did not become blown out. However, the longer exposures are important to capture the finer detail of the nebulosity. 

Sunday, October 06, 2013

Three Images In One Night


The trouble with being an amateur astronomer in the UK is the reliability of the weather. On more than a handful of occasions, I have spent an hour or so meticulously setting up the scope, framing my image and calibrating the guide camera, only to find the clouds have rolled in before I have managed to capture a single image.  So I could not believe my luck last night, when surprisingly, the forecast was accurate and we were blessed with an extremely clear and still night. The result was not one, but three images.

Firstly, The Ring Nebula (M57), which is a planetary nebula in the constellation of Lyra and is approximately 2,300 light years from earth. It was formed when a shell of ionized gas was expelled by a giant red star, during its dying transformation into a white dwarf. The image comprises 16 x 120s exposures.
 
The Ring Nebula (M57)

Next was Pleiades, or the Seven Sisters (M45), which is an open star cluster located in the constellation Taurus and is approximately 380 light years from Earth. This image comprises 4 x 200s exposures.

Pleiades (M45)

Finally, the most difficult of the three to capture - The Eagle Nebula (M16), which is an open star cluster and diffuse emission nebula in the constellation Serpens and is approximately 7,000 light years from Earth. Within it are several star forming gas and dust regions, including the famous 'Pillars of Creation'. This image comprises 9 x 200s exposures.

The Eagle Nebula (M16)

All three images are the result of multiple exposures, captured using my astro-moddified Canon EOS 1000D, attached to my Sky-Watcher Explorer 190MN Pro. A 2" Hutech IDAS LPS P2 filter was used to enhance contrast and reduce the effect of light pollution, which makes the faint areas of nebulosity easier to process. Once calibrated and stacked using Nebulosity 3 the images were processed using Adobe Photoshop CS6.

Considering all three images were the result of one night under the stars, I am really pleased with the outcome. Had I spent longer on each subject, in order to capture more expsoures, the result would have been even better, but that can wait for another night!

Sunday, September 01, 2013

Capturing and Processing Andromeda


I think this has to be my favourite image so far - captured last night from my back garden using my astro-moddified Canon EOS 1000D, attached to my Sky-Watcher Explorer 190MN Pro. The image is of our close neighbour - the Andromeda Galaxy (M31) - and is the result of almost 90 minutes of exposures (5 x 5min + 30 x 2min), aligned and stacked using Nebulosity 3 and processed using Adobe Photoshop CS6.

The Andomeda Galaxy (M31)
Having initially aligned and stacked the images in Nebulosity 3, I exported the stacked image as a 16 bit TIFF file so that I can process it in Adobe Photoshop CS6 - it is important to remember that at this stage the majority of the finer detail is obscured, so we need to do some tweaking in order to get a nice clean result.

Unprocessed image of M31 after initial alignment and stacking
Without going into too much detail, there are a several stages that we need to perform on this image in order to get it to look like the one at the top of this post. Many thanks to Neil Heacock for sharing his workflow online for others to use.

  1. Adjust levels and curves - effectively, we want to ensure the image is not clipped whilst enhancing the lighter areas of the image so they show up more in contrast to the darker background.
  2. Apply gradient filter - I use Russell Croman's Gradient XTerminator, which is a paid-for plug-in filter for Adobe Photoshop CS6. This basically reduces vignetting in the image that can result in significant colour gradient across the image - especially in the corners.
  3. Apply Local Contrast Enhancement action - this is the first of Noel Carboni's Astronomy Tools for Photoshop. Again, you'll need to purchase these tools, that are effectively a set of pre-programmed actions, but they are an invaluable tool and will deliver excellent results whilst saving you significant time and effort. The purpose of running the Local Contrast Enhancement action is to enhance the contrast between the cloudy elements of the galaxy and the darker dust lanes.
  4. Apply Enhance DSO Reduce Stars action - another of Noel Carboni's tools, this one increases the lighter areas of nebulosity without increasing the brighter portions of the image, increasing brightness without over exposing the stars.
  5. Increase Saturation - this enhances the colour of stars and dust lanes in the galaxy. be careful not to go overboard with this - you do not want the image looking over processed.
  6. Apply Noise Reduction. Another of Noel Carboni's tools - I told you they were invaluable. There are two versions available in his set of tools. Space Noise Reduction (SNR) and Deep Space Noise Reduction (DSNR). SNR will reduce the effect of noise across the entire image, whilst DSNR will leave the brighter areas alone and just reduce the effect of noise in the background. In the image above I used SNR initially, as I had a little noise in the nebulosity, then ran DSNR to further reduce the noise in the background.
  7. Apply the Smart Sharpen filter - if applied to the highlights, whilst filtering the shadow areas, this filter does a nice job of sharpening the detail in the nebulosity and dust lanes without re-adding noise to the overall image.
  8. Apply Less Crunchy More Fuzzy action - the last of Noel Carboni's tools that we need for this image, this adds a little blur to the nebulosity areas, adding the final layer of polish to your image.