Saturday, April 21, 2018

Sol - Photobombed By A Plane!


Something a little different today! This is a composite image of the sun, showing the surface detail and prominences, while being photobombed by a passing plane.

The image was taken using an Altair GPCAM 290M with a 0.5x focal reducer, attached to a Lunt LS50 THa B600 solar scope. The image was captured using SharpCap Pro, pre-processed using AutoStakkert2 and Registax6, with final processing done using Photoshop CC.

20180420 Sol and Plane Photobomb

Sol - Photobombed By A PLane

Tuesday, August 22, 2017

The Roll-Off-Roof Observatory


It's not finished yet, but now that the roll-off-roof is installed, I couldn't resist posting a sneak peak of the new observatory.

 
And here is a short video showing the roll-off-roof in action.

Friday, January 08, 2016

Comparing the Sky-Watcher 190MN Pro and Altair Wave 115ED with 0.79x Reducer/Flattener


A rare combination of clear skies, stable atmospherics and no moon last night finally provided me with an opportunity to fully test the potential of the Altair Wave 115 ED Triplet Refractor, combined with the Planostar 0.79x Reducer/Flattener - and boy was it worth the wait!

I wanted to compare the results to my previous scope - the extremely capable Sky-Watcher Explorer 190MN Pro Mak-Newtonian Astrograph.  So I chose one of my all-time favourite subjects - M42, the Great Orion Nebula and Running Man.  The image I captured using my 190MN was the first of my own astro-photos that made me go wow!  The image comprised of 10 x 300s, 10 x 200s and 25 x 45s exposures, captured and stacked using Nebulosity 3 and processed using Photoshop CS6.  The final result is now framed and has pride of place on the wall above my desk.  I was convinced it was going to be hard to beat.

My previous attempt, using the Sky-Watcher Explorer 190MN Pro
Now, before I compare the images I must point out that this is not going to be a direct, scientific comparison.  For a start, there are a couple of significant differences between the 2 scopes; FOV being the most obvious, with 1.35° x 0.9° for the 190MN Pro, vs 2.13° x 1.42° for the 115ED with the 0.79x Reducer/Flattener fitted.  The aperture being another significant difference, with the 190MN Pro being 65% larger than that of the 115ED.  The 190MN Pro is also marginally faster, with a Focal Ratio of 5.3, vs 5.53 for the 115ED.  However, I did use the same QHY8L CCD camera to capture the image and the NEQ6 mount and Lodestar XPress guide camera were also the same.

In an attempt to compensate for the smaller aperture and slightly slower Focal Ratio, I increased the length of the exposures to allow as much light to reach the camera's sensor as possible.  The final image, which you can see below, is the result of 14 x 600s and 15 x 30s exposures, captured and stacked using Nebulosity 4 and processed using Photoshop CS6.  Some may say this is an unfair comparison, but all I wanted to do was see if the Altair Wave 115ED was capable of achieving similar results to the Sky-Watcher Explorer 190MN Pro.  The answer is yes - definitely!  But that is my opinion - let me know what you think.

My latest version, using the Altair Wave 115ED and 0.79x Reducer/Flattener

Friday, December 25, 2015

Merry Christmas


The weather has been unseasonably wet and windy of late, so I decided to take advantage of a break in the clouds and take a few photos of the beautiful (almost) full moon on Christmas Eve. Imagine my surprise when I went to edit them and discovered that one of the images had been photo-bombed by Santa! Merry Christmas one and all!

Photo-bombed by Santa - Christmas Eve 2015

Sunday, November 22, 2015

All About Space Magazine Article


About 6 weeks ago I was contacted by Gemma Lavender - the features editor of All About Space Magazine. She had seen my photos of the lunar eclipse on Twitter and wanted to know if I would be interested in writing an article for their monthly 'Stargazing Stories' feature - a section of the magazine where people write about how they became involved in astronomy, as well as offering tips for beginners.

My son subscribes to the magazine and we regularly read it together - I think it is very well written and pitched at just the right level so that it isn't too heavy for beginners, but still has lots of interesting articles. I also like the fact that it isn't overly packed full of adverts like some other well known astronomy magazines. So, keen to see the look on my son's face when he opened the next edition, I spent the next evening writing my article so I could meet the deadline I had been given.

Realistically, I expected mine to be one of many articles submitted each month and didn't think it would be published straight away, so I was almost as surprised as my son when issue 45 arrived and there was my article on page 91 - my very own full page spread!

For those that don't subscribe to the magazine, I strongly recommend it - especially if you share your interest in space with your children. In the meantime, Gemma has kindly given me permission to post a copy of the article here for you to read. Let me know what you think.

Reproduced with the kind permission of Imagine Publishing

Sunday, November 01, 2015

First Light With The Planostar 0.79x Reducer/Flattener


The weather wasn't brilliant on Halloween, but it was the clearest night for some time and so an ideal opportunity to test out my new Altair Planostar 3" 0.79x reducer/flattener - and what better target to choose on Halloween than the Wizard Nebula!

Once focussed, I was immediately impressed with the apparent flatness of the preview image. The stars were small bright pin pricks of light and those in the corners did not appear elongated. I chose an exposure length of 600s and set up the camera to capture a series of 15 images. When it came to processing, I had to discard 6 images due to worsening conditions as the night progressed, but in the earlier images it was evident that the faster focal length meant I was able to capture a reasonable amount of nebulosity.

NGC7380 - The Wizard Nebula
Overall I am quite pleased with the final image; especially considering the conditions. I'm sure that on another night, with better seeing, I could draw out a lot more of the fainter nebulosity, but the overall flatness of the image and nice crisp round stars proves the value of the reducer/flattener - I can't wait to try it out on a crisp and clear night.

Sunday, October 18, 2015

Planostar 0.79x Reducer/Flattener - First Impressions!


I purchased the Altair Wave Series 115 ED Triplet Apo telescope earlier this year on the basis of 
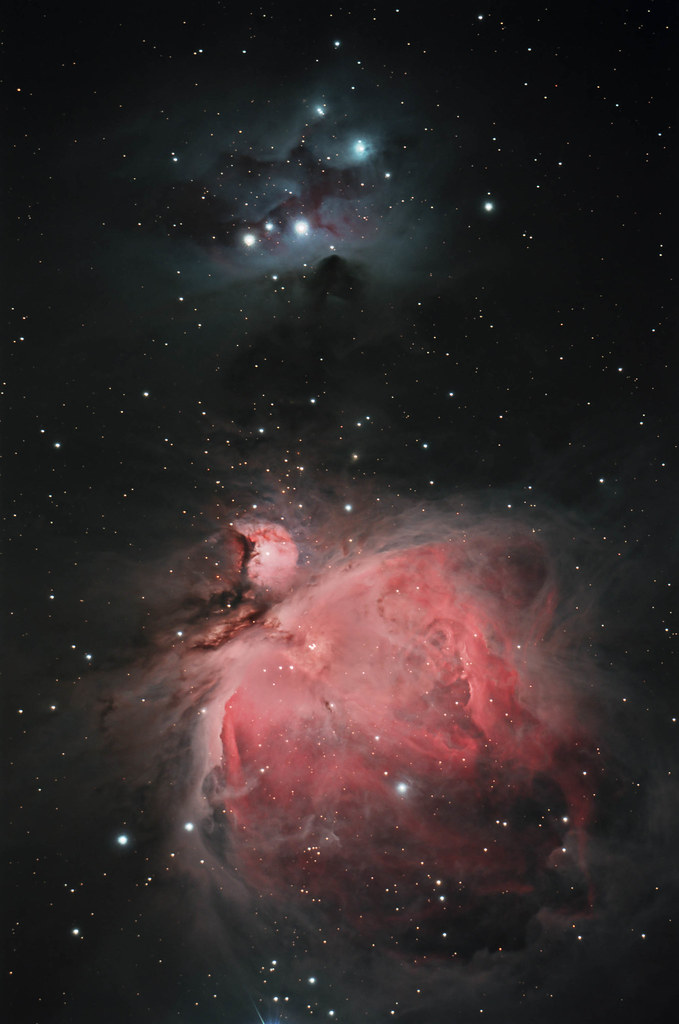
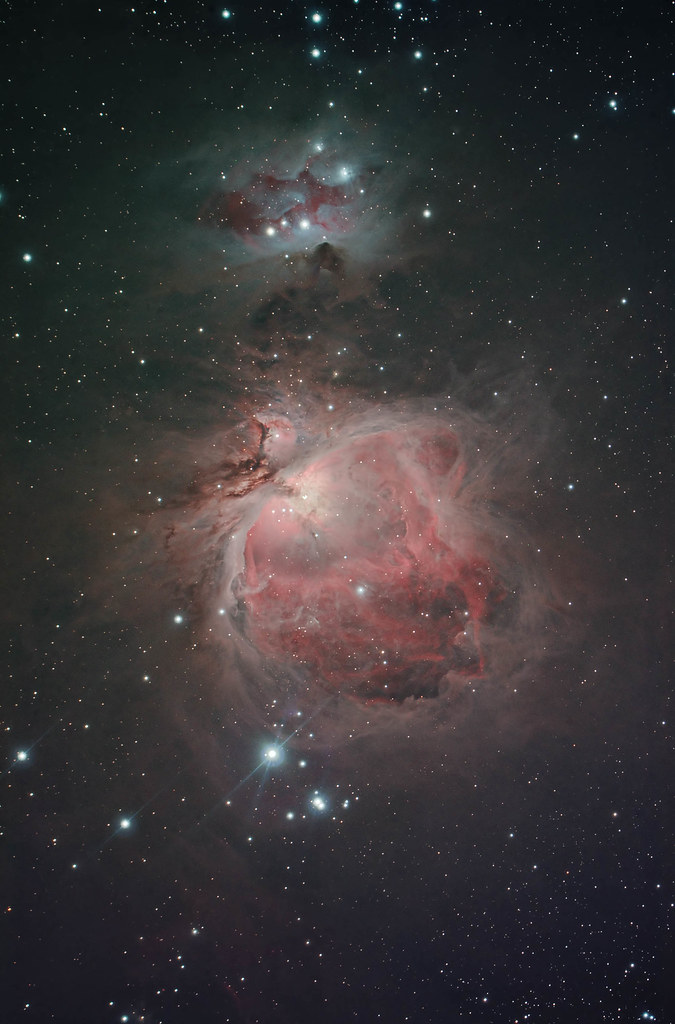
Olly Penrice's review in Astronomy Now Magazine and have been really impressed with it. In particular, it really punches above its weight when it comes to astrophography, which is my primary interest.  With a native focal ratio of F7 it isn't particularly fast, but it has a very generous Field of View (FOV) of 1.68° x 1.12° when combined with my QHY8L CCD, which is enough to fit the entire Andromeda Galaxy in to frame. However, for fainter targets, a faster scope gives a definite advantage when it comes to light gathering and sometimes a wider FOV is required - whether to fit a larger nebula in to the frame without having to do a mosaic, or just to capture the sheer brilliance of a wide star field. Therefore, I decided to take the plunge and purchase the Altair Planostar 0.79x Reducer/Flattener which reduces the focal ratio down to a much more effective F5.53, with the FOV increasing to 2.13° x 1.42°.


Upon opening the box, I was impressed with the solid build and general weight of the Reducer/Flattener - it is slightly smaller than the more common Altair Planostar 1.0x Flattener that I bought with the scope.  It attached directly on to the 3" focusser but came with an adaptor for the smaller 2" focusser on the newer versions of the Wave Series.

The 0.79x Reducer/Flattener attached to the Wave Series 115ED Triplet Apo
The one thing to bear in mind when it comes to using a Reducer and/or Field Flattener is the need to get the spacing between the lens and the camera sensor spot on, otherwise you could end up with elongated stars in the corners and significant vignetting - particularly if you are using a larger camera sensor such as a full frame DSLR. According to the installation diagram, the recommended spacing for the 115ED is 56.04mm - I used a vernier gauge to get this measurement exact. This is slightly more generous than the 51.5mm recommended for the 1.0x Flattener, which doesn't sound like much, but is the difference between being able to accommodate my filter drawer or not.

Just enough room to accommodate my Of-Axis Guider and Filter Drawer
The final step in the installation was to adjust the focus point on my Off-Axis Guider so that the guide camera is at the same focus point as the main imaging camera. I just need some clear weather now to do a star test - as always, the purchase of new gear means cloud for the foreseeable future!

Monday, September 28, 2015

Super Blood Moon


It has been all over the news for the past day or so, but for those that missed it this morning was a rare opportunity to see a Super Blood Moon.  Whilst lunar eclipses are fairly common, the last total eclipse observed in the UK was in 2008 and the next will be in 2019.  However, what made this one particularly impressive was the fact it coincided with a Super Moon - the moon being at its minimum distance (perigee) to Earth, which means it appears 14% bigger and brighter.

My image of the Super Blood Moon
The name Blood Moon comes from the rust coloured appearance of the moon during totality, due to the small amount of light hitting the moons surface being filtered by the extremities of the earths atmosphere, removing the blue wavelengths and leaving a red coloured shadow on the moons surface.

Although totality was at 03:11 BST in the UK, the event started at 02:00, so it was an early start to make sure the telescope and camera were set up in time. I used the QHY8L CCD camera, attached to my Altair Wave 115ED refractor to ensure I had a good shot of the entire Moon's surface.  I started with exposures of just 0.001 seconds, but after totality I had to increase this to 25 seconds to capture the full detail of the surface.  I took 76 images to begin with, at 30 second intervals, which I processed using Time Lapse Assembler to create a short time lapse as the eclipse approached totality.  I then switched to single shots to get some detailed still images.


It might have been an early start, but it was an incredible sight and well worth the lack of sleep. If you missed it, don't worry - there will be another opportunity in 2033!

Monday, April 06, 2015

The Leo Triplet


Work has been getting in the way recently so I haven't had much opportunity to get the telescope out, but the Easter holidays has meant I have been at home and the unusually good weather has given us astronomers a couple of relatively clear nights. Whilst the sky has not been completely clear, it was worth having a go at capturing some Deep Space Objects, although the near full moon rising just after 22:30 meant that I didn't have log before sky glow eliminated all but the brightest objects.

After a surprisingly quick setup, considering how many weeks it has been since I have had the scope out, I slewed to the M66 Group - otherwise known as The Leo Triplet. This group of three galaxies is about 35 million light-years away in the constellation Leo and consists of the spiral galaxies M65, M66, and NGC 3628.

The final image is the result of 8 x 300s exposures captured with a QHY8L camera attached to my Altair Wave 115 triplet refractor. The images were captured and stacked using Nebulosity 3 and processed using Photoshop CS6.

The Leo Triplet

Friday, March 20, 2015

Catching The Eclipse


I missed out on the last opportunity to witness a solar eclipse in the UK, so I have been awaiting today's 98% partial eclipse with much anticipation. I had planned ahead and purchased my solar eclipse glasses well in advance, to avoid disappointment, so it was just typical that the British skies were overcast this morning. However, I was not going to give up so easily and so after a quick check of local weather forecasts, I jumped in the car with my family and we headed about 20 miles north of where we live in hope of clearer skies. It would seem luck was obviously with us today, because just before the peak of the eclipse at 09:25, the clouds started to break up and we caught a wonderful glimpse of the sun through a gap - a crescent slither of light in the sky. It was possible to get a couple of photographs between the clouds, but the heavy overcast sky somewhat reduced the overall effect of the eclipse - the sky did not darken as much as I had expected, for instance. However, these events don't happen very often in the UK, so I was pleased I was able to take my family to witness it live on this occasion.

Partial Solar Eclipse - 20 Mar 2015


Sunday, February 22, 2015

The Rosette Nebula


With a clear sky forecast all night last night, I decided to have a go at imaging something new last. A quick look at Stellarium showed that the beautiful NGC2237 - otherwise known as The Rosette Nebula - was perfectly positioned in the sky. So, with my son to assist, I set-up the scope and had the target centred in my field of view within 20 minutes. After ensuring the focussing was okay I initiated a series of 14 x 900s exposures, using Nebulosity 3 to control the QHY8L CCD attached to my Altair Astro Wave 115 triplet refractor. I initially tried a medium 'dither' between shots - this basically moves the scope a little between each shot to try and minimise any backlash in the mount, but it took ages to settle down for the next exposure so I cancelled that and re-started without the 'dither' option selected.

With over 3 hours of data to collect, we retired inside to keep warm and left it running. Once the imaging run was complete I decided to have a go at capturing some 'Flats'. I have not used them before, but I have a few dust spots on my optics somewhere and I was given some good advice on Stargazerslounge last week about using Flat frames to get rid of them, so I thought I'd give it a go. I don't have a light panel, but my iPad screen with a sheet of paper in-front of it to defuse the light, seemed to work well enough.

When it came to processing the image the Flats and Darks made a good job of getting rid of a lot of artifices, although there were still some that needed removing manually. It was also at this stage that I realised that having stopped the session to turn of the 'dither' option, my focussing wasn't as spot on after I restarted. As a result, the Stars were not as sharp as I would have liked. I also have doubts about the field flattener - it is probably something to do with the spacing between flattener and CCD, which needs to be accurate down to a very small tolerance - more work required there I think. However, after a little processing in Photoshop, the final result is actually fairly reasonable I think.

The Rosette Nebula (NGC2237)
The Rosette Nebula (NGC2237) - 14 x 900s, Altair Wave 115 Triplet and QHY8L