Tuesday, November 12, 2013

M42 Orion Nebula - First Light With The QHY8L


After what seemed like a long wait, I finally had a clear night this week and managed to get first light with the QHY8L that I purchased second hand on astrobuysell.com. The target was M42 (the Orion Nebula) and I have to say that I am quite pleased with the result. The image was captured using the QHY8L camera, cooled to -20 degrees, and attached to a Sky-Watcher Explorer 190MN Pro. The image consists of 10 x 200s and 10 x 45s exposures, captured using the QHY EZCAP software, with initial processing and stacking in Nebulosity 3 and final processing in Photoshop CS6. Equipment used is the Sky-Watcher Explorer 190MN Pro, mounted on a NEQ6 with a 2" Hutech IDAS LPS P2 filter to enhance contrast and reduce the effect of light pollution.

The Orion Nebula (M42)
M42 Orion Nebula

The shorter exposures were important so that the Trapezium (tight group of 4 bright stars in the core) did not become blown out. However, the longer exposures are important to capture the finer detail of the nebulosity. 

Saturday, October 26, 2013

The QHY8L Cooled CCD Review


I have achieved some good results with my modified DSLR, but controlling noise has always been difficult and has often limited the amount of faint detail I have been able to draw out. So I have decided to take the next step up and purchase a cooled CCD camera.

The advantage of these specialist cameras is that you can actively cool the CCD sensor down to well below 0 degrees, which dramatically reduces thermal noise in the final image and makes processing far easier. But, before rushing out and spending my hard earned money I first needed to decide whether to go for a Mono or One Shot Colour (OSC) camera. Mono cameras are far more sensitive, as each pixel picks up 100% of the incoming light, whereas the bayer matrix in a OSC means only about 33% of the incoming light makes it through to a specific pixel. However, there are disadvantages to the Mono camera - each imaging session requires three times the number of images, as the image needs to be separately captured using red, green and blue filters, which are then combined during processing to create the final color image. With the unpredictable weather in the UK, I wasn't sure this would always be achievable and I didn't want to have to split my imaging sessions over multiple nights (I'm not that patient). The other disadvantage with the Mono is the cost - a OSC camera is ready to go straight out of the box, whereas a Mono camera requires additional filters and a filter wheel, which can add a few hundred pounds to the price. So, for me the decision was fairly simple - I opted for a OSC camera. Maybe in the future I will go down the route of Mono imaging, but for now I will keep things simple.

With that decision made, it was a case of finding an affordable camera with a reasonably good sized sensor. Having been used to the large sensor on my DSLR, I did not want to dramatically downsize, but in the world of CCD cameras large sensors are usually very expensive. However, my research soon led me to the reasonably priced QHY8L, which has a 1.8" CMOS sensor with an effective resolution of 3032 x 2016 pixels, with the 7.8um x 7.8um pixel size being ideal for high sensitivity deep space imaging. The camera is also capable of being cooled down to about 35 degrees below ambient temperature (-20 is the recommended operating temperature) which is more than adequate.

QHY8L fitted with my own light pollution filter
The main dealer for QHY cameras in the UK is Modern Astronomy, but I was fortunate enough to find a secondhand one on AstroBuySell last week for a very good price, so I finally decided to stop thinking about it and took the plunge. It arrived a couple of days ago and the first thing that struck me was the size - it's bigger than I expected from the pictures I had seen on the internet (slightly bigger than a coke can). That said, it is only about 400g, so isn't going to add too much weight to my setup. The build quality seems good to me, although some users have expressed concerns online that the connection ports on the rear seem a little fragile and may get damaged with the weight of the cables. There is a solution to this, which can be found online, but it seems okay to me. The nosepiece includes a built in IR cut filter, which protects the sensor from dust, but also has a standard T2 thread that allows attachment of an adapter or extension tube - I have a 2" Hutech IDAS LPS-P2 filter that I would not want to be without, so I have been able to attach it using this method, as seen in the photo. Also included with the camera is a desicant tube, that connects to the sensor chamber to deal with any moisture that may form.

When setting up the camera for an imaging session it is very important that you run through the setup procedure exactly as detailed in the user guide, otherwise you risk damaging the sensor.

1. Connect the USB cable to the back of the camera
2. Connect the USB cable to the computer
3. Start the bundled EZCap capture software and select the QHY8L from the drop down menu
4. Connect the 9 pin power lead to the back of the camera
5. Connect the 9pin power lead to the DC201 power adaptor
6. Connect the mains power supply to the DC201 power adaptor

Once power is applied you'll hear the cooling system whir into action - it isn't excessive, but it's certainly not silent. You'll then need to set the desired cooling temperature and give it 5 minutes to settle down before starting the imaging session. I will go into more detail on the EZCap software in another entry, but I have found it to be comprehensive and easy to use.

As far as the camera's performance goes, I have been very impressed so far with the test images captured using the QHY8L, although I did notice a big difference in the colours compared to my DSLR - a little less blue/purple than I was used to. However, I will have to wait for clearer skies to do a proper test run.

In the meantime I will start working on building up a library of dark files. This is another advantage to a set point cooling system - the camera can be left in the garage or shed overnight, capturing dark images for the commonly used exposure lengths. If you remember, with a non-cooled camera dark files need to be captured after each imaging session, because they need to be captured at the same temperature as the lights. But, with a cooled CCD, the temperature is set by the user so will ideally always be the same (-20 is recommended for the QHY8L). This means you can use the same library of dark files over and over again, which is great news for those who don't like hanging around in the cold for another hour at the end of the main imaging session.

Overall, my first impression of this camera is very good. It is a well built camera for the price, with a good sized sensor that should potentially be capable of delivering some very good results.

Sunday, October 06, 2013

Three Images In One Night


The trouble with being an amateur astronomer in the UK is the reliability of the weather. On more than a handful of occasions, I have spent an hour or so meticulously setting up the scope, framing my image and calibrating the guide camera, only to find the clouds have rolled in before I have managed to capture a single image.  So I could not believe my luck last night, when surprisingly, the forecast was accurate and we were blessed with an extremely clear and still night. The result was not one, but three images.

Firstly, The Ring Nebula (M57), which is a planetary nebula in the constellation of Lyra and is approximately 2,300 light years from earth. It was formed when a shell of ionized gas was expelled by a giant red star, during its dying transformation into a white dwarf. The image comprises 16 x 120s exposures.
 
The Ring Nebula (M57)

Next was Pleiades, or the Seven Sisters (M45), which is an open star cluster located in the constellation Taurus and is approximately 380 light years from Earth. This image comprises 4 x 200s exposures.

Pleiades (M45)

Finally, the most difficult of the three to capture - The Eagle Nebula (M16), which is an open star cluster and diffuse emission nebula in the constellation Serpens and is approximately 7,000 light years from Earth. Within it are several star forming gas and dust regions, including the famous 'Pillars of Creation'. This image comprises 9 x 200s exposures.

The Eagle Nebula (M16)

All three images are the result of multiple exposures, captured using my astro-moddified Canon EOS 1000D, attached to my Sky-Watcher Explorer 190MN Pro. A 2" Hutech IDAS LPS P2 filter was used to enhance contrast and reduce the effect of light pollution, which makes the faint areas of nebulosity easier to process. Once calibrated and stacked using Nebulosity 3 the images were processed using Adobe Photoshop CS6.

Considering all three images were the result of one night under the stars, I am really pleased with the outcome. Had I spent longer on each subject, in order to capture more expsoures, the result would have been even better, but that can wait for another night!

Tuesday, September 10, 2013

Getting Started: Learning The Night Sky


Astronomy is a fascinating hobby for the beginner and doesn't necessarily require complicated or expensive equipment to get started. Equipped with nothing more than the naked eye, a map of the stars and an inquisitive mind it is possible to observe many fascinating features of the night sky. Once you are ready to take the next step, a good pair of binoculars is often a much better investment than a similarly priced telescope. Binoculars are simple to use and readily available and will provide you with an excellent view of the moon and planets; constellations; meteor showers and even the odd deep space object. In fact, this is probably the best way to start - it allows you to learn the night sky and navigate easily to points of interest.
A view of Orion from my suburban, light-polluted, garden
There are plenty of books and magazines that you can use to help you find your way around; 'Philip's Stargazing 2013' or a 'Philip's Planisphere' are both popular choices, however, I would particularly recommend 'Turn Left At Orion' by Guy Consolmagno and Dan M. Davis. Written specifically for beginners, it is the perfect reference book for the amateur astronomer, providing easy to follow instructions on how to find the most common celestial objects as well as illustrating how they will appear through low and high powered scopes.

For the more technically minded, there are some excellent interactive planetarium applications available for the home computer, providing a 3D view of the night sky based on the date, time and location. Stellarium is a free application for Windows, Mac and Linux and is extremely popular due to its ease of use and the number of advanced features it boasts, including telescope control, large object databases and detailed information about the objects you may wish to view.

A screenshot from Stellarium
As most people probably don't want to be setting up their home computer out in the garden, there are a number of excellent mobile planetarium Apps available for smartphone and tablet devices, that provide a highly portable interactive sky map. The more advanced of these Apps provide a similar level of features to the free desktop applications, making them a useful tool when trying to find a particular object in the night sky.

Remember, learning your way around the constellations is a fascinating way to start observing the night sky and does not require anything more complicated than a map of the stars and a pair of binoculars. If you do decide to take things further, learning to navigate the stars from the beginning will help you out immensely when you eventually decide to take the plunge and buy your first scope.

Sunday, September 01, 2013

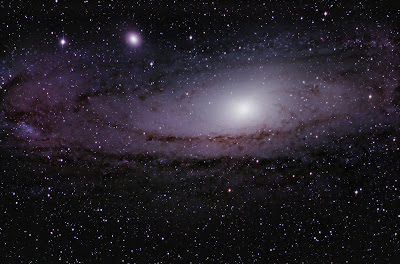
Capturing and Processing Andromeda


I think this has to be my favourite image so far - captured last night from my back garden using my astro-moddified Canon EOS 1000D, attached to my Sky-Watcher Explorer 190MN Pro. The image is of our close neighbour - the Andromeda Galaxy (M31) - and is the result of almost 90 minutes of exposures (5 x 5min + 30 x 2min), aligned and stacked using Nebulosity 3 and processed using Adobe Photoshop CS6.

The Andomeda Galaxy (M31)
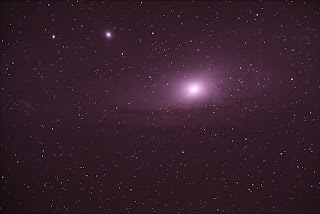
Having initially aligned and stacked the images in Nebulosity 3, I exported the stacked image as a 16 bit TIFF file so that I can process it in Adobe Photoshop CS6 - it is important to remember that at this stage the majority of the finer detail is obscured, so we need to do some tweaking in order to get a nice clean result.

Unprocessed image of M31 after initial alignment and stacking
Without going into too much detail, there are a several stages that we need to perform on this image in order to get it to look like the one at the top of this post. Many thanks to Neil Heacock for sharing his workflow online for others to use.

  1. Adjust levels and curves - effectively, we want to ensure the image is not clipped whilst enhancing the lighter areas of the image so they show up more in contrast to the darker background.
  2. Apply gradient filter - I use Russell Croman's Gradient XTerminator, which is a paid-for plug-in filter for Adobe Photoshop CS6. This basically reduces vignetting in the image that can result in significant colour gradient across the image - especially in the corners.
  3. Apply Local Contrast Enhancement action - this is the first of Noel Carboni's Astronomy Tools for Photoshop. Again, you'll need to purchase these tools, that are effectively a set of pre-programmed actions, but they are an invaluable tool and will deliver excellent results whilst saving you significant time and effort. The purpose of running the Local Contrast Enhancement action is to enhance the contrast between the cloudy elements of the galaxy and the darker dust lanes.
  4. Apply Enhance DSO Reduce Stars action - another of Noel Carboni's tools, this one increases the lighter areas of nebulosity without increasing the brighter portions of the image, increasing brightness without over exposing the stars.
  5. Increase Saturation - this enhances the colour of stars and dust lanes in the galaxy. be careful not to go overboard with this - you do not want the image looking over processed.
  6. Apply Noise Reduction. Another of Noel Carboni's tools - I told you they were invaluable. There are two versions available in his set of tools. Space Noise Reduction (SNR) and Deep Space Noise Reduction (DSNR). SNR will reduce the effect of noise across the entire image, whilst DSNR will leave the brighter areas alone and just reduce the effect of noise in the background. In the image above I used SNR initially, as I had a little noise in the nebulosity, then ran DSNR to further reduce the noise in the background.
  7. Apply the Smart Sharpen filter - if applied to the highlights, whilst filtering the shadow areas, this filter does a nice job of sharpening the detail in the nebulosity and dust lanes without re-adding noise to the overall image.
  8. Apply Less Crunchy More Fuzzy action - the last of Noel Carboni's tools that we need for this image, this adds a little blur to the nebulosity areas, adding the final layer of polish to your image. 

Monday, August 26, 2013

Experimenting with Star Trails and Time Lapse


The weather has been a little unpredictable over the past few nights, so rather than spending ages setting up the scope and camera, I decided to stick to my Nikon J1 compact camera and do some experimenting with capturing star trails and time lapse video.

Firstly I mounted the camera on a standard photography tripod in the garden, facing Polaris. I then set the camera to manual and setup the interval timer to capture 180 x 15s exposures. It was then a case of popping back inside and watching a couple of episodes of Breaking Bad on TV whilst the camera did its job. Once complete, I then put the lens cap back on and took another 100 x 15s 'dark' exposures - the reason for doing this is so that I can capture the noise signals created on the CCD within the camera - these can then be extracted from the main images - 'lights' - in order to get a cleaner image. I can discuss this process in more detail in a later post.

Processing was fairly straight forward. I use Craig Starks' Nebulosity 3, which is available for both Mac OS X and Windows, to combine the 'darks' to create the 'master dark'. This is then subtracted from each of the 180 lights to create the processed images, which are then saved in JPEG format.

In order to create a star trail image I used a freeware program for Mac OS X, Windows and Linux called StarStaX. It is a very simple program to use - you simply select the processed images you wish to stack and select the Blending Mode as 'Gap Filling'. You can then watch the image build gradually in the preview window. Once complete, 'Save As' and that's it - you're done! Here is one I made earlier..

Star Trails - 180 x 15s exposures
Next I used the same processed images I used to create the star trails, to create a time lapse video of the stars' movement across the sky. I use Time Lapse Assembler, which is for Mac OS X, but Windows users can use a similar program called VirtualDub - both are freeware and very simple to use. Just select the folder containing your processed images and then press encode. The resulting movie file is quite large, so I used Quicktime Player to compress the file for the web. You can see the results here..


I think the star trails turned out really well considering the conditions - bright moon and light polluted skies. The time lapse worked, but I think much darker skies are required in order to pick out more stars and increase the visual impact.

Wednesday, August 21, 2013

Once in a Blue Moon


The summer is great - I love the warm weather and long evenings, but they are no fun for an astrophotographer as it never really gets dark enough. So I am glad that after a break of a couple of months, I am finally able to get out in the garden imaging again.

Last night I set up early in anticipation of the full moon, which also happened to be a Blue Moon. These are relatively rare - hence the expression 'once in a blue moon'. The term Blue Moon is more often used to describe the second full moon in a calendar month, however, traditionally the term refers to the third full moon in a season that contains four full moons - hence why last night was a Blue Moon.

Blue Moon, taken 20 Aug 2013
The August 'Blue Moon', taken 20 Aug 2013
This photo was taken using my astro-modded Canon EOS 1000D, attached to my Sky-Watcher Explorer 190MN Pro. The image was captured on my MacBook Pro using Craig Starks' Nebulosity 3 and processed using Adobe Lightroom 5.

Tuesday, August 20, 2013

Introduction


Firstly - welcome to my astrophotography journal!

Over the past few years my knowledge of astronomy, and in particular astrophotography, has grown and what was once a mere interest has now become more of a passion. I have bought my own telescope, that I use from my back garden whenever the British weather allows, and I have also developed my interest in astrophotography; an interest that is both rewarding, yet highly frustrating at times. As a result, I started this blog as a way of recording my achievements, problems and solutions, equipment and thoughts. Mainly for my own reference, but also as a possible guide for others - should anyone be interested.